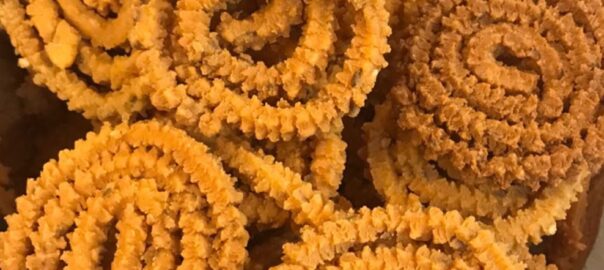
All posts by admin

20Sep/20

Murkul – Chakli

Please follow and like us:
0
Print Recipe
Murkul - Chakli
Cuisine Indian
Servings
Cuisine Indian
Servings
Recipe Notes


Murkul - Chakli

Crispy Rice and Gram flour Mukul Chakli. Its very easy and quick to prepare. This takes very basic ingredients and little effort, but the Joy of giving homemade snacks is even more bigger.

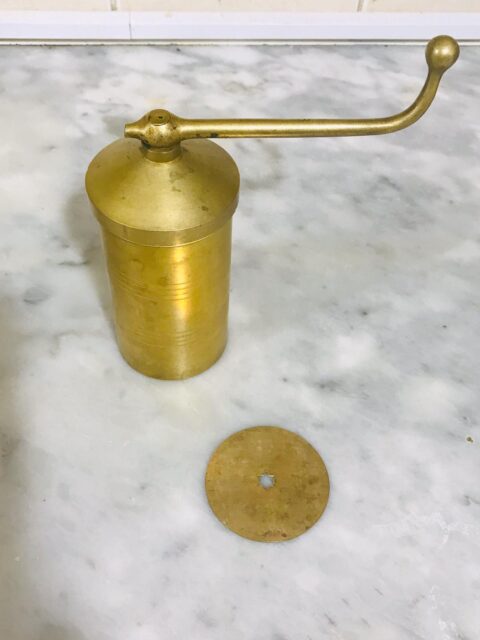
You need to have a chakli maker for making these chakli, that's easily available in the market. I'm linking below with amazon in the recipe notes section.


Course Snack
Cuisine Indian
Prep Time 15 minutes
Cook Time 30 minutes
Total Time 45 minutes
Servings 6
Author Mehraj Farheen (admin)

Ingredients

  • 1 cup Gram Flour
  • 1 cup Rice Flour
  • 1 tsp Red chilly powder
  • 1 tsp chat Masala
  • 1/2 tsp Salt adjust as per your intake
  • 1/6 tsp Asafoetida
  • 1 & 1/2 tbspn Butter
  • 1/4 tsp Turmeric
  • 1 tsp Cumin seeds
  • 1 tsp Sesame Seeds
  • 1/2 tsp Ajwain or carom seeds
  • 1 cup water Adjust*

Instructions

  1. Melt butter on very low heat and add Asafoetida

  2. Mix all the dry ingredients and add the melted butter. Give it a mix with hand until the butter is incorporated in the flour mix.

  3. Add water, and prepare a hard dough. (you may need a little more)

  4. Transfer a portion of dough in to the chakli maker

  5. Prepare the chakli on greased tray or baking tray

  6. Fry on low - medium heat until light brown

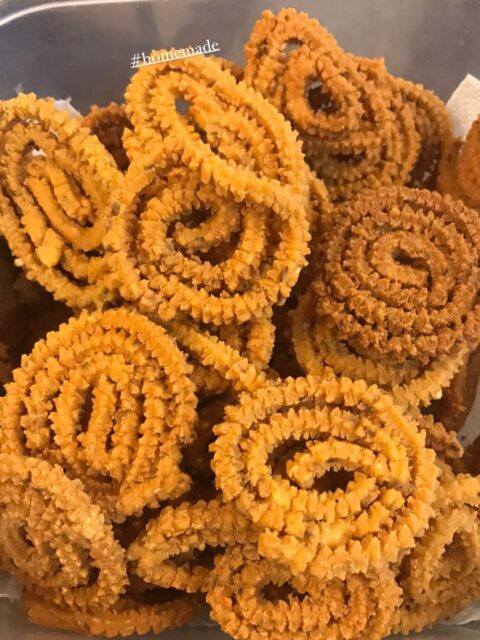
  7. That's it, the chakli or murkul is ready you can easily store up to 15 days in air tight container. But I bet you it won't last that long.

Recipe Notes

The Chakli maker  is available on amazon. Check the below Link

https://www.amazon.in/b?node=16319294031

08May/20

Mango Cheesecake

Mango CheeseCake

Mango Cheesecake I tried for the first time, and ill definitely prepare this again and again. The creamy texture of cream cheese perfectly complimented with sweet tangy texture of the mangoes, the vermicelli base is unusually and give a good crunch to the base.

Lets get started, with recipe.

Course Dessert
Cuisine international
Servings 6

Ingredients

  • 4 Medium mangoes (prepare the pulp in mixer)
  • 1 & 1/2 cup heavy whipping cream
  • 1 & 1/2 cup Cream Cheese
  • 1/2 cup Castor Sugar
  • 2 & 1/2 cups Vermicilli
  • 5 Tbsp Butter
  • 2 Tbspn Condensed Milk
  • 4 Tbspn White sugar
  • 1 Pack Mango Jelly (optional)
  • 1 Pack Gelatin (optional)

Instructions

  1. Prepare the base - 

    Sauté the vermicelli with 2 tablespoon of butter until Brown.

    Next add 2 tablespoon of condensed milk.

    Arrange this in a cake tin while still hot, prepare the base and make sure your evenly spreading the base.

    Bake the base for 1o minutes at 200 degrees, after baking, keep in refrigerator for chilling.


  2. Prepare the cream base.

    Take the whipping cream in chilled container and whip it with 1/2 cup of castor sugar until soft peaks.

    Mix the cream cheese and 1/2 of mango puree. incorporate well.

    Pour in this mango cream layer over the chilled vermicelli base, and place in refrigerator again

  3. Prepare the mango jelly layer( homemade)

    Use the remaining mango puree (1/2 cup approx), 3 tablespoon of butter and white sugar, and cook until dissolve.

    Keep in refrigerator for chilling before pouring over the cheesecake(important, do not add the hot mango jelly over the cheese cake). 

    Allow it to set for 2 hours

    That's it, mango cheese cake is ready to serve. Always serve it cool.

Recipe Notes

1- You can also use kunafa vermicelli for the base.

2- You can also use digestive biscuit for the base layer.

3- If you wish your cheesecake to be very firm, make sure your using gelatin in the mango cream layer (step -2), follow the box instruction for using the gelatin.

4- If you want to use ready mango jelly, follow the box instruction. prepare the jelly and por it after cooling it slightly.

5- If you like the cheeseckae to be more sweeter, you add more sugar in the mango jelly layer (around 6 tablespoon)


Please follow and like us:
0
Print Recipe
Mango Cheesecake
Servings
Servings
07Apr/20

Banana Bread / Banane cake


Banana Bread

Quarantine Baking is trending during this COVID-19 times, while this would be remembered as a part of history, everone is trying to make best out of this #stayhome time.

For me, its all about the house chores, kids times and bit of recipes sharing on Instagram or here

Banana Cake is very simple, failproof and delicious bake option for all the beginers, the flavour of over wiped bananas will really take your bread's taste to the next level. While you might find lot of recipes on net. I'm sharing with you all, my best and simple recipe.

I also have another healthy banana bread variant on my blog. Check the link below.

http://homemadebyfarheen.com/recipe/whole-wheat-banana-bread-with-coconut/

Lets get started!!

Course Dessert
Cuisine international
Prep Time 15 minutes
Total Time 50 minutes
Servings 4
Author Mehraj Farheen

Ingredients

  • 2 Cups All purpose flour
  • 2 Medium Eggs
  • 5 Riped Bananas
  • 2 tsp Baking Powder
  • 1/4 tsp Baking Soda
  • 1 cup sugar (half brown + half white)
  • 1/4 tsp Salt
  • 3/4th Cup Oil
  • 1/2 Cup chopped walnuts / chocho chips I used Both
  • 1/4 tsp cinnamom powder
  • 1 tsp Vanilla Essence

Instructions

  1. Preheat the oven at 180 degrees and prepare your bread loaf tin or baking dish by ling a parchment paper o dusting it.

    Keep all the ingredients handy before starting as shown below

  2.  Prepare the wet ingredients

    Mash 4 Bananas, then add eggs, oil, sugar, vanilla essence and whisk for 10 minutes

  3.  Prepare the dry ingredients

    Sieve the flour, with baking powder, soda, salt and cinnamon powder, repeat this step twice or thrice.

  4.  Now gently mix the dry and wet ingredients. keep mixing for around 2-3 min until its well combined.

  5. Lastly, Add the chopped nuts, Chocolate chips and transfer the cake batter into a bread loaf tin or any baking dish.

  6. Place in pre-heated oven and bake for around 35-40 mins. keep checking after 25 mins to avoid overcooking.

  7. Thats all delicious banana bread is ready to serve!

Recipe Notes

You can also use 1 cup while wheat flour and 1 cup all purpose flour as well.

Use the same batter for cup cakes as well.

Please follow and like us:
0
Print Recipe
Banana Bread / Banane cake
Servings
Servings
16Nov/19

Moringa/ Drumstick Leaves Daal

Drumstick leaves Daal

I call it superfood, also known as Moringa Leaves, it’s packed with vitamins, minerals and amino acids.

They are many medicinal benefits of these leaves, it has anti-inflammatory and anti-cancer benefit.

The recipe is quite simple and comforting, with fried chicken or fish on the side with, this lentils daal will make your meal!

Course Main Course
Cuisine Indian
Prep Time 5 minutes
Cook Time 40 minutes
Total Time 45 minutes
Author Mehraj Farheen

Ingredients

  • 1 Cup Toor dal
  • 3 Cup Moringa leaves
  • 2 Large tomatoes
  • 5-6 Green chilly
  • 1 Tsp Dried Chilly Flakes
  • 3-4 Whole Dry chillies
  • 1/4 Tsp Turmeric powder
  • 1/2 Tsp Roasted cumin powder
  • 1 tsp Ginger garlic paste
  • Washed and cleaned Tamrind About a lemon size
  • 1 Bunch Fresh Corainder leaves
  • 1/2 Bunch Curry Leaves
  • 1 Large Onion
  • 3 Drumsticks shaved and cut into 3 inch long
  • Salt as per intake

For Tempering - 1/2 tsp Mustard seeds, 1 tsp Cumin Seeds, 1 pinch Asafoetida, 5 tbsp Oil, 7-8 crushed garlic cloves, red chilly

Instructions

  1. Wash the soaked dal and add ginger garlic paste, Moringa leaves, turmeric, dried chilly, chilly flakes, tomatoes, onion and allow 3-4 whistles with 2 cups of water.

    As shown below.

  2. After the whistles, mashed the dal coarsely, add tamarinc paste, drumsticks, 1 cup hot water and allow to cook for 15 minutes. The tamarind cooks and the drumsticks are soft.

  3. Add Curry leaves, corainder Leaves and adjust salt

  4. Prepare Tempering using all ingredients mentioned under 'temperng' and pour over cooked Dal

Recipe Notes

  • You can also use Desi Ghee if you want to make it taste real good.
  • If you wish to make it more spicer, add 1/2 tsp of red chilly powder in the bagaar(Tempering)
  • If you prefer very soft drumstick, pressure cook it along with dal, but its might get fully dissolved.
  • you can also used Tamarind pulp or soaked tamarind water instead of adding tamarind directly.
Please follow and like us:
0
Print Recipe
Drumstick Leaves Dal
Servings
Servings
24Oct/19

Kaddu Ki Kheer

Kaddu Ki Kheer

'Kaddu ki kheer' aka sweet 'bottlegourd pudding' is like weakness of every Hyderabadi foodie.  There are many nostalgic moments of each Hyderabadi  attached with this pudding. My father loves sweets and this pudding was made home at very frequently. 

Its a rich creamy  sweet pudding with goodness of crushed bottle gourd, tapioca seeds.

Milk is reduced by simmering along with along with granulated rice for an hour and then the remaining ingredients are added, vanilla flavoring adds to the taste and final touch of toasted dry fruits makes this desert totally irresistible.


Course Dessert
Cuisine Indian
Prep Time 15 minutes
Cook Time 1 hour 30 minutes
Total Time 1 hour 45 minutes
Author Mehraj Farheen

Ingredients

  • 2 Litre Milk reduced to almost half
  • 1 Can Condensed Milk 400 ml
  • 1 Medium Bottle gourd Grated, de-seeded and boiled
  • 1 Cup Tapioca Seeds Boiled
  • 1 Cup Refined Sugar
  • 1/4 tsp Fresh Cardamon Powder
  • 2 tsp Pure Vanilla Extract
  • 1 Cup Basmati Rice Soaked for 30 mins
  • 1/4 tsp Green Color
  • 1/2 cup Fresh Milk

Instructions

  1. Boil the milk and reduce it to half until the milk turns brown.  As shown in the image below. This is very critical step, the taste and texture of the Kheer depends on how well the milk is slowly simmered and reduced.

  2. Boil the grated Bottle gourd for ten minutes, drain the water and add to the boiled milk.

    Next boil the Tapioca /sago seeds, drain the excess water and add to the boil milk

  3. Grind coarsely soaked Basmati rice with little water and add to the boiled milk.

  4. Add condensed Milk, sugar and cook for ten minutes

  5. Then add Vanilla essense and cardamom powder, and simmer for five minutes

  6. Lastly, If your making for guest, and really want to make it rich and creamy, then add fresh cream.

  7. The condensed milk and cream must be avoided if you have fresh khova/khoya.

    Use around 1/2 cup khoya instead.

Please follow and like us:
0
Print Recipe
Kaddu Ki Kheer
Servings
Servings
07Oct/19

Mutton curry with Coconut Milk

Mutton curry with coconut milk


Course Main Course
Cuisine Indian
Prep Time 45 minutes
Author Mehraj Farheen

Ingredients

  • 750 Grams Mutton with bones
  • 2 Medium Onions Thinly sliced
  • 1 Small Tomato
  • 3-4 Green chillies As per intake
  • Curry leaves 20-25 leaves
  • 2 Tbsp Coriander powder
  • 1 Tsp Garam masala
  • 1 tsp Red chilly Adjust as per your intake
  • 1/4 Tsp Turmeric
  • 4 Cardamom
  • 1 Tsp Fennel seeds
  • 4 Tbsp Oil
  • 1 & 1/2 Cup Fresh Coconut milk
  • 1/2 Bunch Fresh coriander leaves
  • 1/4 Tsp Pepper powder
  • Salt to taste
  • 1/2 Star anise
  • 1 Tbsp Ginger garlic paste
  • 1 Tbsp Cornflour slurry

Instructions

  1. Take fennel seeds, cardamoms, star anise and crush coarsely using a mortar and pestle

  2. In pressure cooker, add oil and cook the crushed spices on low flame.

  3. Add thinly sliced onion, and cook until transculent

  4. Add ginger garlic paste as shown and cook until raw smell vanishes and starts sticking to the bottom of cooker.

  5. Once the gg paste is cooked add spices - turmeric, chilly powder, coriander powder, half of Garam masala powder. Another half spoon we’ll add later.

  6. Once the spices are cooked, add mutton and cook on high female 3-4 minutes

  7. Add 1/2 glass boiling water and cook the mutton for 5-6 whistles until tender. After releasing the pressure, add green chillies, curry leaves and cook on high heat 

  8. At this point add the remaining Garam masala. 

  9. Now add fresh coconut milk to the curry along with cornflour slurry and keep on simmer 10 minutes.

  10. Adjust salt, add pepper and fresh Corainder leaves. 

    Enjoy with saffron rice or plain rice.

Recipe Notes

Note - if you really need the south Indian taste, then use the Garam masala with fennel and star anise seeds. 

The flavors from coconut, curry leaves, fennel seeds are irresistible and very different. 

Please follow and like us:
0
Print Recipe
Mutton curry with Coconut Milk
Servings
Servings
28Sep/19

Chicken sweet corn soup

Chicken sweet corn soup

Who doesn’t love soups, and when it comes to chicken sweet corn soup it’s almost everyone’s favorite😋😋

The recipe I’m sharing is obviously very simple!  Chicken and veggies are sautéd with lil oil and garlic and then left to simmer for sometime. Once the chicken and veggies are tender, cornflour slurry and egg along with seasonings are added and topped of it with finely chopped spring onions. Slurp!!!


Course Appetizer
Cuisine Chinese
Prep Time 10 minutes
Cook Time 30 minutes
Total Time 40 minutes
Servings 4
Author Mehraj farheen

Ingredients

  • 1 Medium Chicken breast
  • 1 Medium Carrot
  • 1 Medium Onion
  • 1 Small bunch Spring onion
  • 5 Tbspn Cornflour
  • 1 Medium Egg
  • Salt As per taste
  • 1 Tsp Pepper(1/2 crushed and 1/2 powder)
  • 5-6 Pods Garlic
  • Vineger As needed just before service
  • 1 Tbspn Soy sauce Just before serving

Instructions

  1. Take around 1 tspn oil and 1 tsp butter in large pot and add finely crushed garlic followed by finely chopped onion and sauté for 2-3 minutes 

  2. Cut the chicken breast into small pieces and add to the pot, and sauté for 2-3 minutes 

  3. Now add the rightly chopped veggies -carrot and onions and sauté for 2-3 minutes.

  4. Add around 4 glasses of boiling water and the stock simmer for sometime atelast 15 minutes. The prepared stock will be as shown below.

  5. Once the stock is ready, remove the veggies and chicken. Shred the chicken and finely chop the vegetables as shown below. 

  6. Add the veggies and chicken to the same chicken stock. Bring to boil.

  7. Now add 5 tablespoon of cornflour slurry and keep stirring. 

  8. Once the soup thickens, add salt, crushed pepper, pepper powder. Followed by one small beaten egg.

  9. Before adding the corn slurry add around 1/2 cup of corn kernels, gentle crushed them and add to the prepared stock.

  10. After adding the beaten egg, keep stirrring so the egg is mixed in the soup evenly.

  11. Finally  add finely chopped spring onions.

Recipe Notes

Few important points - 

If you wish to use chicken with bone, then during  shredding chicken step, discard the bones. I do not prefer soup of chicken bones.

if you really want that white color in your soup, then note the below points.

  1- Do not add the black pepper in the beginning while preparing stock.

  2 - Do not over brown the garlic.

  3. Avoid carrot

Always add the vineger and soya sauce (If needed) just before serving.

The key  ingredient is most of Chinese soups is Ajinomoto, I haven’t used it in this recipe’. I don’t prefer to add this ingredient. If you have it, then use one generous pinch of it.


Please follow and like us:
0
Print Recipe
Chicken sweet corn soup
Servings
Servings
15Jun/19

Green chicken curry

Green chicken curry

I really feel the name of this chicken curry could be little better, as it does no justice to the simplicity and taste of this curry.

The recipe ingredients are very simple yet the outcome is very rich. The chicken is marinated with all spices and then slow cooked with yoghurt and fresh herbs.

If your serving this chicken curry to guests it’s always better to prepare a day before as it taste better the next day

Course Main Course
Cuisine Indian
Prep Time 15 minutes
Cook Time 40 minutes
Total Time 55 minutes
Author Mehraj Farheen

Ingredients

  • 1 Whole chicken curry cut
  • 2 Cups Yoghurt
  • 6-8 Green chilly paste Adjust as per your spice intake
  • 2 Tsp Ginger garlic paste
  • 1/2 Tsp Zeera powder
  • 1/2 Tsp Turmeric
  • Garam masala - 1/2 tsp shahzeera, cruised cardomom 4-5, bay leaves 2-3
  • 1 Tsp Garam masala
  • 1 Cup Fresh coriander leaves
  • 1 Cup Fresh mint leaves
  • Salt As needed
  • 3 Medium Crispy fried onion(reserve oil after frying as it will be used in curry)
  • 1 Cup Frying onions and for curry

Instructions

  1. Marinate the chicken with ginger garlic paste, turmeric, zeera powder, whole garam masala, salt  and keep for 1 hours as shown in pic 

  2. Next, add green chilly paste, youghurt and fresh leaves, oil(in which the onions are fried) cook on high flame for 5 minutes and then let it simmer for on low heat for 30 mins. Cover the curry and do  not add any water. Occasionally stir with very light hands.


  3. After 30 minutes,  the oil separates, at this point add fried onions and simmer.  

  4. If you wish you can add little lemon just before serving.

Please follow and like us:
0
Print Recipe
Green chicken curry
Course Main Dish
Cuisine Indian
Servings
Course Main Dish
Cuisine Indian
Servings
12Jun/19

Hyderabadi Mirchi ka salan

5 from 1 vote
Print

Mirchi Ka Salan

The best side dish for Dum biryani other than raita is this extremely flavorful curry. This curry have rich textures with grounded paste of roasted peanuts, sesame seeds and desiccated coconut. The grounded paste is then slowly cooked with tamarind and fresh green herbs along with chilly peppers. Imagine the flavors 🙂 

I have made the recipe simple by combining many steps into few simple steps.  I call it 'Dump and cook' method (probably a method invented by me and this is what I do almost every time).

Not only does this curry goes well with biryani, it also tastes best with any flat bread, khuboos or even white rice.

You can also replace the chilly peppers with brinjals/eggplants/aubergine.

Course Side Dish
Cuisine Indian
Prep Time 10 minutes
Cook Time 40 minutes
Total Time 50 minutes
Author Mehraj Farheen

Ingredients

  • 1/2 Cup of all three ingredients Peanuts, Sesame seeds, Dessicated dried coconut
  • 15-20 Large Chilly peppers Washed, dried and make a small slit on each pepper
  • 2 cup oil
  • 1 Cup Fresh Corainder Leaves
  • 1 Cup Fresh Mint leaves
  • 8-10 Green Chilly
  • 3 tbsp Tamarind (size of big lemon) De-seeded ,cleanedand soaked in little water
  • Salt as need
  • 2 tbsp Corainder Seeds
  • 1 tbsp Cumin seeds
  • 2 Bojwar ka phool
  • For tempering / Bagaar tsp mustard seeds, 1/2 tspn zeera, 2 pinch fenugreek seeds, 1/4 tsp kalonji seeds(black seeds), 1/2 cup curry leaves

Instructions

  1. Dry raost Peanuts, Sesame seeds, Dessicated dried coconut and set aside

  2. Then Dry raost Corainder Seeds, Cumin seeds, Bojwar ka phool and set aside

  3. In mixer add all the dry roasted ingredients along with Fresh Mint leaves, Coriander Leaves, tamarind, green chillies, salt and make a fine paste using very little water.

    (You need to add the tamarind itself, not just the pulp, increase the quantity of tamarind if you wish to make it little extra sour)

  4. Heat oil and fry the chilly peppers until slightly brown, please take care as it might splutter. Remove the chilly pepper and set aside

  5. In the same oil, add  1 tsp mustard seeds, 1/2 tspn zeera, 2 pinch fenugreek seeds, 1/4 tsp kalonji seeds(black seeds) and half of curry leaves, once they splutter, just dump the grounded paste and fry for 10 minutes. Add 1/2 glass water(yo can also use tamarind soaked water here) and allow it to cook for 30 minutes on low flame. 

  6. Keep stirring every 5 minutes to make sure the curryis not sticking at the bottom.

  7. Once the oil is released the water has evaporated, add the fried peppers/Mirchis and cooked on low for ten minutes. Adjust the consistency as desired.

  8. The very delicious and the most favourite biryani partner is ready.

Recipe Notes

Make sure, your not adding any red chilly to this curry as it might loose its color.

Always, prepare this curry one day before serving, as this curry tends to taste better as it gets aged.

You can easily reserve this curry upto one week.


Please follow and like us:
0
Print Recipe
Hyderabadi Mirchi ka salan
Cuisine Indian
Servings
Cuisine Indian
Servings
22May/19

Pita bread pockets with chicken

Avacado Hummus

5 from 1 vote
Print

Pita bread sandwich

When it comes to sandwiches arab cuisine have so  many delicious varieties of it. The sandwich recipe i'm sharing below is basically inspired by two very famous sandwiches arayes(grilled Pita with minced meat) and mushakal(with falafel and mix vegetables).

My twist in this sandwich is that I'm using two dips inside the sandwich with grill chicken strips.

The first dip happens to be my favorite and probably the greatest gift to world given by arab cuisine - HUMMUS

The second dip is mix of thick yoghurt with cucumber and lemon juice.

Imagine a scrumptious bite of a sandwich with goodness of hummus, yoghurt and grill chicken, just irresistible and I'm sure it will be a big hit on your iftar table. It would ideal for breakfast or lunch box as well.

Hummus Recipe Below.

http://homemadebyfarheen.com/avacado-hummus/


Course Breakfast, Snack
Cuisine arabic
Prep Time 20 minutes
Cook Time 10 minutes
Total Time 30 minutes
Servings 4
Author Mehraj Farheen

Ingredients

  • 1 Boneless Chicken Breast
  • Spices for chicken marination Salt, black pepper, lemon juice,generous pinch of cinnamom powder
  • 2 tbsp Olive oil
  • Handful Fresh corainder and mint leaves
  • 1 Cup Thick Yoghurt
  • 2 Cucumber Finely chopped
  • 4 tbsp Hummus

Instructions

  1. Cut the pita breads into quater and set aside

  2. Cut the Chicken pieces in stripes and marinate with Salt, black pepper, lemon juice,generous pinch of cinnamom powder for ten minutes

  3. Add oil, Use a grill pan to saute the chicken pieces, you can also use any normal pan for cooking. The chicken filling is ready!

  4. Take one cup one yoghurt, add finely chooped cucumber, lemon juice, salt and fresh herbs. The yoghurt dip is ready!

  5. Now, the final assembly,  take pita bread and spread 1 teaspoon hummus as first layer, followed by chicken filing and last  fill bread with yoghurt dip.

  6. Sprinkle some olive oil on the top before service.

  7. Make sure your preparing this sandwich just before service.

  8. In case,  you want to avoid the yoghurt dip, you can then grill the pita bread for 1 minute on each side with little olive oil.

Please follow and like us:
0
Print Recipe
Pita bread sandwich
Servings
Servings