Yearly Archives: 2019

16Nov/19

Moringa/ Drumstick Leaves Daal

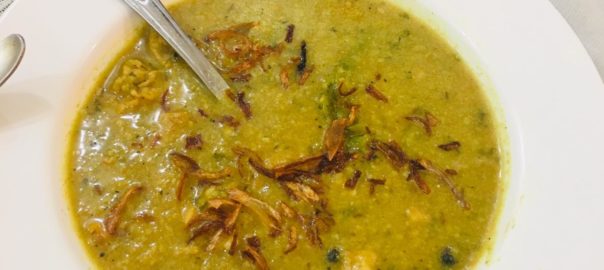
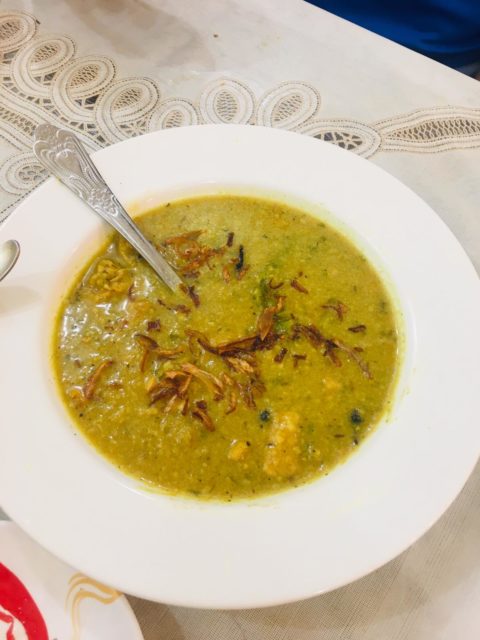
Drumstick leaves Daal

I call it superfood, also known as Moringa Leaves, it’s packed with vitamins, minerals and amino acids.

They are many medicinal benefits of these leaves, it has anti-inflammatory and anti-cancer benefit.

The recipe is quite simple and comforting, with fried chicken or fish on the side with, this lentils daal will make your meal!

Course Main Course
Cuisine Indian
Prep Time 5 minutes
Cook Time 40 minutes
Total Time 45 minutes
Author Mehraj Farheen

Ingredients

  • 1 Cup Toor dal
  • 3 Cup Moringa leaves
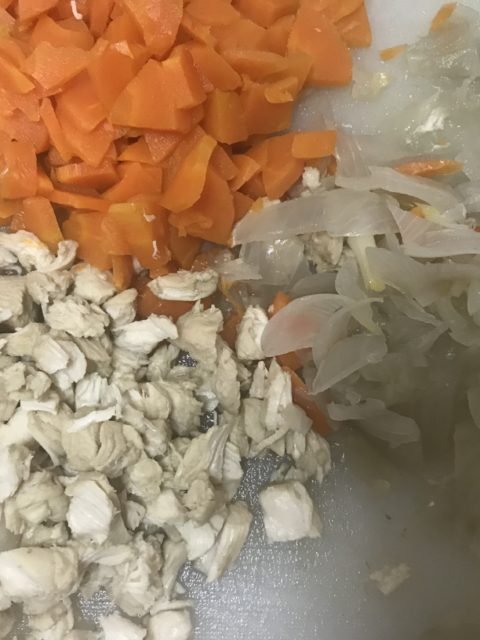
  • 2 Large tomatoes
  • 5-6 Green chilly
  • 1 Tsp Dried Chilly Flakes
  • 3-4 Whole Dry chillies
  • 1/4 Tsp Turmeric powder
  • 1/2 Tsp Roasted cumin powder
  • 1 tsp Ginger garlic paste
  • Washed and cleaned Tamrind About a lemon size
  • 1 Bunch Fresh Corainder leaves
  • 1/2 Bunch Curry Leaves
  • 1 Large Onion
  • 3 Drumsticks shaved and cut into 3 inch long
  • Salt as per intake

For Tempering - 1/2 tsp Mustard seeds, 1 tsp Cumin Seeds, 1 pinch Asafoetida, 5 tbsp Oil, 7-8 crushed garlic cloves, red chilly

Instructions

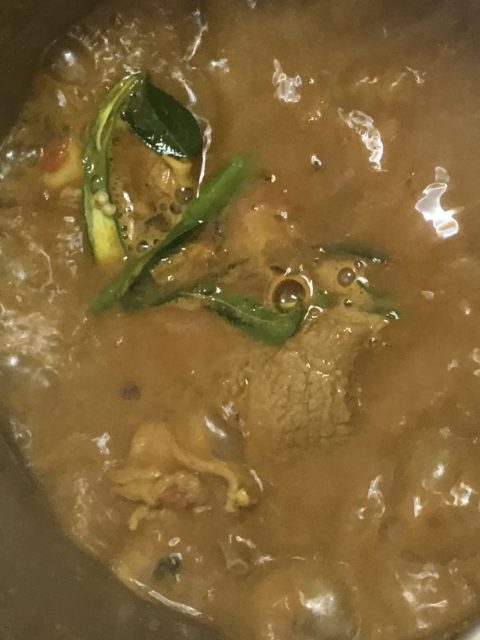
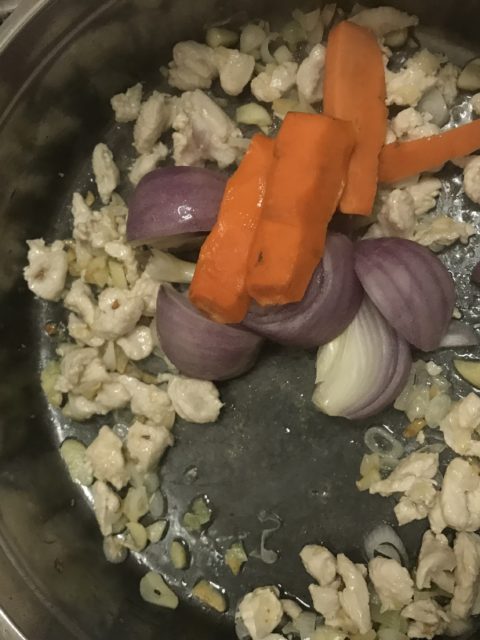
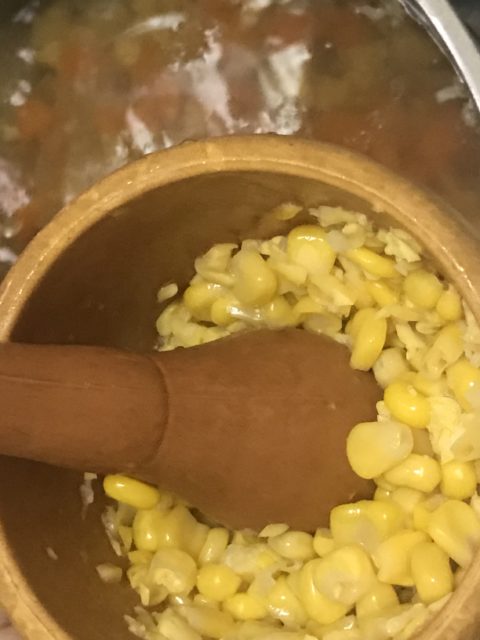
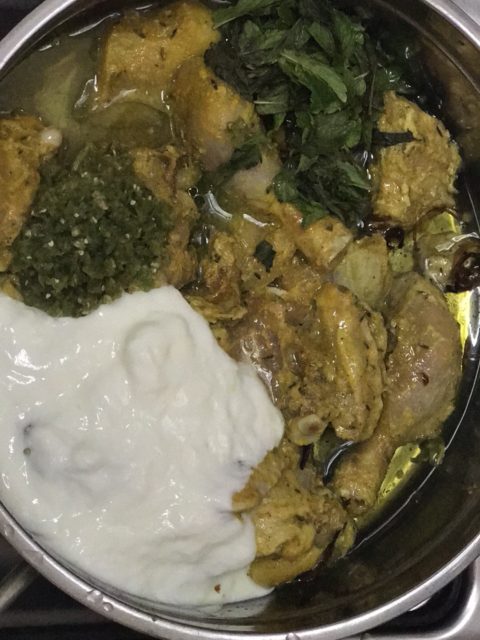
  1. Wash the soaked dal and add ginger garlic paste, Moringa leaves, turmeric, dried chilly, chilly flakes, tomatoes, onion and allow 3-4 whistles with 2 cups of water.

    As shown below.

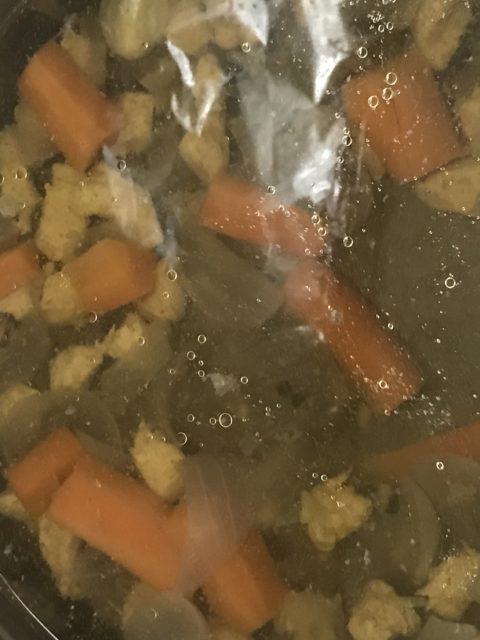
  2. After the whistles, mashed the dal coarsely, add tamarinc paste, drumsticks, 1 cup hot water and allow to cook for 15 minutes. The tamarind cooks and the drumsticks are soft.

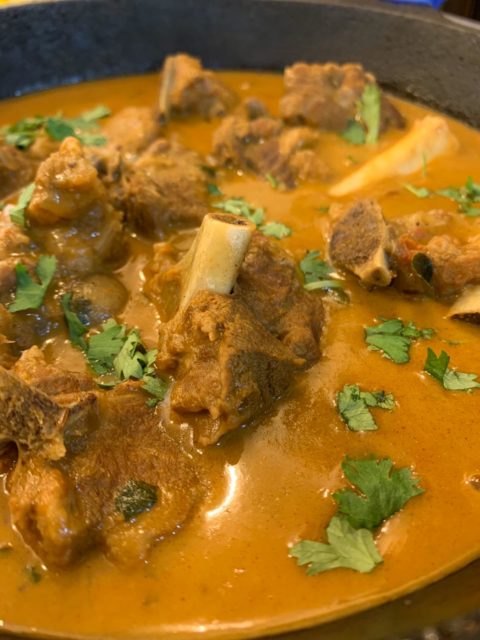
  3. Add Curry leaves, corainder Leaves and adjust salt

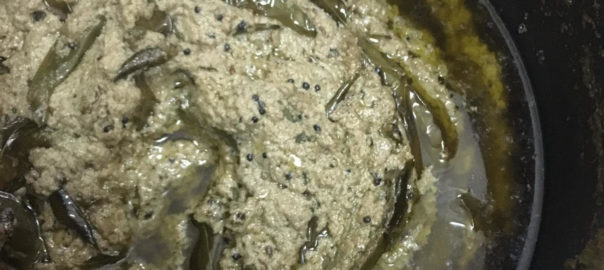
  4. Prepare Tempering using all ingredients mentioned under 'temperng' and pour over cooked Dal

Recipe Notes

  • You can also use Desi Ghee if you want to make it taste real good.
  • If you wish to make it more spicer, add 1/2 tsp of red chilly powder in the bagaar(Tempering)
  • If you prefer very soft drumstick, pressure cook it along with dal, but its might get fully dissolved.
  • you can also used Tamarind pulp or soaked tamarind water instead of adding tamarind directly.
Please follow and like us:
0
Print Recipe
Drumstick Leaves Dal
Servings
Servings
24Oct/19

Kaddu Ki Kheer

Kaddu Ki Kheer

'Kaddu ki kheer' aka sweet 'bottlegourd pudding' is like weakness of every Hyderabadi foodie.  There are many nostalgic moments of each Hyderabadi  attached with this pudding. My father loves sweets and this pudding was made home at very frequently. 

Its a rich creamy  sweet pudding with goodness of crushed bottle gourd, tapioca seeds.

Milk is reduced by simmering along with along with granulated rice for an hour and then the remaining ingredients are added, vanilla flavoring adds to the taste and final touch of toasted dry fruits makes this desert totally irresistible.


Course Dessert
Cuisine Indian
Prep Time 15 minutes
Cook Time 1 hour 30 minutes
Total Time 1 hour 45 minutes
Author Mehraj Farheen

Ingredients

  • 2 Litre Milk reduced to almost half
  • 1 Can Condensed Milk 400 ml
  • 1 Medium Bottle gourd Grated, de-seeded and boiled
  • 1 Cup Tapioca Seeds Boiled
  • 1 Cup Refined Sugar
  • 1/4 tsp Fresh Cardamon Powder
  • 2 tsp Pure Vanilla Extract
  • 1 Cup Basmati Rice Soaked for 30 mins
  • 1/4 tsp Green Color
  • 1/2 cup Fresh Milk

Instructions

  1. Boil the milk and reduce it to half until the milk turns brown.  As shown in the image below. This is very critical step, the taste and texture of the Kheer depends on how well the milk is slowly simmered and reduced.

  2. Boil the grated Bottle gourd for ten minutes, drain the water and add to the boiled milk.

    Next boil the Tapioca /sago seeds, drain the excess water and add to the boil milk

  3. Grind coarsely soaked Basmati rice with little water and add to the boiled milk.

  4. Add condensed Milk, sugar and cook for ten minutes

  5. Then add Vanilla essense and cardamom powder, and simmer for five minutes

  6. Lastly, If your making for guest, and really want to make it rich and creamy, then add fresh cream.

  7. The condensed milk and cream must be avoided if you have fresh khova/khoya.

    Use around 1/2 cup khoya instead.

Please follow and like us:
0
Print Recipe
Kaddu Ki Kheer
Servings
Servings
07Oct/19

Mutton curry with Coconut Milk

Mutton curry with coconut milk


Course Main Course
Cuisine Indian
Prep Time 45 minutes
Author Mehraj Farheen

Ingredients

  • 750 Grams Mutton with bones
  • 2 Medium Onions Thinly sliced
  • 1 Small Tomato
  • 3-4 Green chillies As per intake
  • Curry leaves 20-25 leaves
  • 2 Tbsp Coriander powder
  • 1 Tsp Garam masala
  • 1 tsp Red chilly Adjust as per your intake
  • 1/4 Tsp Turmeric
  • 4 Cardamom
  • 1 Tsp Fennel seeds
  • 4 Tbsp Oil
  • 1 & 1/2 Cup Fresh Coconut milk
  • 1/2 Bunch Fresh coriander leaves
  • 1/4 Tsp Pepper powder
  • Salt to taste
  • 1/2 Star anise
  • 1 Tbsp Ginger garlic paste
  • 1 Tbsp Cornflour slurry

Instructions

  1. Take fennel seeds, cardamoms, star anise and crush coarsely using a mortar and pestle

  2. In pressure cooker, add oil and cook the crushed spices on low flame.

  3. Add thinly sliced onion, and cook until transculent

  4. Add ginger garlic paste as shown and cook until raw smell vanishes and starts sticking to the bottom of cooker.

  5. Once the gg paste is cooked add spices - turmeric, chilly powder, coriander powder, half of Garam masala powder. Another half spoon we’ll add later.

  6. Once the spices are cooked, add mutton and cook on high female 3-4 minutes

  7. Add 1/2 glass boiling water and cook the mutton for 5-6 whistles until tender. After releasing the pressure, add green chillies, curry leaves and cook on high heat 

  8. At this point add the remaining Garam masala. 

  9. Now add fresh coconut milk to the curry along with cornflour slurry and keep on simmer 10 minutes.

  10. Adjust salt, add pepper and fresh Corainder leaves. 

    Enjoy with saffron rice or plain rice.

Recipe Notes

Note - if you really need the south Indian taste, then use the Garam masala with fennel and star anise seeds. 

The flavors from coconut, curry leaves, fennel seeds are irresistible and very different. 

Please follow and like us:
0
Print Recipe
Mutton curry with Coconut Milk
Servings
Servings
28Sep/19

Chicken sweet corn soup

Chicken sweet corn soup

Who doesn’t love soups, and when it comes to chicken sweet corn soup it’s almost everyone’s favoriteđŸ˜‹đŸ˜‹

The recipe I’m sharing is obviously very simple!  Chicken and veggies are sautĂ©d with lil oil and garlic and then left to simmer for sometime. Once the chicken and veggies are tender, cornflour slurry and egg along with seasonings are added and topped of it with finely chopped spring onions. Slurp!!!


Course Appetizer
Cuisine Chinese
Prep Time 10 minutes
Cook Time 30 minutes
Total Time 40 minutes
Servings 4
Author Mehraj farheen

Ingredients

  • 1 Medium Chicken breast
  • 1 Medium Carrot
  • 1 Medium Onion
  • 1 Small bunch Spring onion
  • 5 Tbspn Cornflour
  • 1 Medium Egg
  • Salt As per taste
  • 1 Tsp Pepper(1/2 crushed and 1/2 powder)
  • 5-6 Pods Garlic
  • Vineger As needed just before service
  • 1 Tbspn Soy sauce Just before serving

Instructions

  1. Take around 1 tspn oil and 1 tsp butter in large pot and add finely crushed garlic followed by finely chopped onion and sautĂ© for 2-3 minutes 

  2. Cut the chicken breast into small pieces and add to the pot, and sautĂ© for 2-3 minutes 

  3. Now add the rightly chopped veggies -carrot and onions and sauté for 2-3 minutes.

  4. Add around 4 glasses of boiling water and the stock simmer for sometime atelast 15 minutes. The prepared stock will be as shown below.

  5. Once the stock is ready, remove the veggies and chicken. Shred the chicken and finely chop the vegetables as shown below. 

  6. Add the veggies and chicken to the same chicken stock. Bring to boil.

  7. Now add 5 tablespoon of cornflour slurry and keep stirring. 

  8. Once the soup thickens, add salt, crushed pepper, pepper powder. Followed by one small beaten egg.

  9. Before adding the corn slurry add around 1/2 cup of corn kernels, gentle crushed them and add to the prepared stock.

  10. After adding the beaten egg, keep stirrring so the egg is mixed in the soup evenly.

  11. Finally  add finely chopped spring onions.

Recipe Notes

Few important points - 

If you wish to use chicken with bone, then during  shredding chicken step, discard the bones. I do not prefer soup of chicken bones.

if you really want that white color in your soup, then note the below points.

  1- Do not add the black pepper in the beginning while preparing stock.

  2 - Do not over brown the garlic.

  3. Avoid carrot

Always add the vineger and soya sauce (If needed) just before serving.

The key  ingredient is most of Chinese soups is Ajinomoto, I haven’t used it in this recipe’. I don’t prefer to add this ingredient. If you have it, then use one generous pinch of it.


Please follow and like us:
0
Print Recipe
Chicken sweet corn soup
Servings
Servings
15Jun/19

Green chicken curry

Green chicken curry

I really feel the name of this chicken curry could be little better, as it does no justice to the simplicity and taste of this curry.

The recipe ingredients are very simple yet the outcome is very rich. The chicken is marinated with all spices and then slow cooked with yoghurt and fresh herbs.

If your serving this chicken curry to guests it’s always better to prepare a day before as it taste better the next day

Course Main Course
Cuisine Indian
Prep Time 15 minutes
Cook Time 40 minutes
Total Time 55 minutes
Author Mehraj Farheen

Ingredients

  • 1 Whole chicken curry cut
  • 2 Cups Yoghurt
  • 6-8 Green chilly paste Adjust as per your spice intake
  • 2 Tsp Ginger garlic paste
  • 1/2 Tsp Zeera powder
  • 1/2 Tsp Turmeric
  • Garam masala - 1/2 tsp shahzeera, cruised cardomom 4-5, bay leaves 2-3
  • 1 Tsp Garam masala
  • 1 Cup Fresh coriander leaves
  • 1 Cup Fresh mint leaves
  • Salt As needed
  • 3 Medium Crispy fried onion(reserve oil after frying as it will be used in curry)
  • 1 Cup Frying onions and for curry

Instructions

  1. Marinate the chicken with ginger garlic paste, turmeric, zeera powder, whole garam masala, salt  and keep for 1 hours as shown in pic 

  2. Next, add green chilly paste, youghurt and fresh leaves, oil(in which the onions are fried) cook on high flame for 5 minutes and then let it simmer for on low heat for 30 mins. Cover the curry and do  not add any water. Occasionally stir with very light hands.


  3. After 30 minutes,  the oil separates, at this point add fried onions and simmer.  

  4. If you wish you can add little lemon just before serving.

Please follow and like us:
0
Print Recipe
Green chicken curry
Course Main Dish
Cuisine Indian
Servings
Course Main Dish
Cuisine Indian
Servings
12Jun/19

Hyderabadi Mirchi ka salan

5 from 1 vote
Print

Mirchi Ka Salan

The best side dish for Dum biryani other than raita is this extremely flavorful curry. This curry have rich textures with grounded paste of roasted peanuts, sesame seeds and desiccated coconut. The grounded paste is then slowly cooked with tamarind and fresh green herbs along with chilly peppers. Imagine the flavors đŸ™‚ 

I have made the recipe simple by combining many steps into few simple steps.  I call it 'Dump and cook' method (probably a method invented by me and this is what I do almost every time).

Not only does this curry goes well with biryani, it also tastes best with any flat bread, khuboos or even white rice.

You can also replace the chilly peppers with brinjals/eggplants/aubergine.

Course Side Dish
Cuisine Indian
Prep Time 10 minutes
Cook Time 40 minutes
Total Time 50 minutes
Author Mehraj Farheen

Ingredients

  • 1/2 Cup of all three ingredients Peanuts, Sesame seeds, Dessicated dried coconut
  • 15-20 Large Chilly peppers Washed, dried and make a small slit on each pepper
  • 2 cup oil
  • 1 Cup Fresh Corainder Leaves
  • 1 Cup Fresh Mint leaves
  • 8-10 Green Chilly
  • 3 tbsp Tamarind (size of big lemon) De-seeded ,cleanedand soaked in little water
  • Salt as need
  • 2 tbsp Corainder Seeds
  • 1 tbsp Cumin seeds
  • 2 Bojwar ka phool
  • For tempering / Bagaar tsp mustard seeds, 1/2 tspn zeera, 2 pinch fenugreek seeds, 1/4 tsp kalonji seeds(black seeds), 1/2 cup curry leaves

Instructions

  1. Dry raost Peanuts, Sesame seeds, Dessicated dried coconut and set aside

  2. Then Dry raost Corainder Seeds, Cumin seeds, Bojwar ka phool and set aside

  3. In mixer add all the dry roasted ingredients along with Fresh Mint leaves, Coriander Leaves, tamarind, green chillies, salt and make a fine paste using very little water.

    (You need to add the tamarind itself, not just the pulp, increase the quantity of tamarind if you wish to make it little extra sour)

  4. Heat oil and fry the chilly peppers until slightly brown, please take care as it might splutter. Remove the chilly pepper and set aside

  5. In the same oil, add  1 tsp mustard seeds, 1/2 tspn zeera, 2 pinch fenugreek seeds, 1/4 tsp kalonji seeds(black seeds) and half of curry leaves, once they splutter, just dump the grounded paste and fry for 10 minutes. Add 1/2 glass water(yo can also use tamarind soaked water here) and allow it to cook for 30 minutes on low flame. 

  6. Keep stirring every 5 minutes to make sure the curryis not sticking at the bottom.

  7. Once the oil is released the water has evaporated, add the fried peppers/Mirchis and cooked on low for ten minutes. Adjust the consistency as desired.

  8. The very delicious and the most favourite biryani partner is ready.

Recipe Notes

Make sure, your not adding any red chilly to this curry as it might loose its color.

Always, prepare this curry one day before serving, as this curry tends to taste better as it gets aged.

You can easily reserve this curry upto one week.


Please follow and like us:
0
Print Recipe
Hyderabadi Mirchi ka salan
Cuisine Indian
Servings
Cuisine Indian
Servings
22May/19

Pita bread pockets with chicken

Avacado Hummus

5 from 1 vote
Print

Pita bread sandwich

When it comes to sandwiches arab cuisine have so  many delicious varieties of it. The sandwich recipe i'm sharing below is basically inspired by two very famous sandwiches arayes(grilled Pita with minced meat) and mushakal(with falafel and mix vegetables).

My twist in this sandwich is that I'm using two dips inside the sandwich with grill chicken strips.

The first dip happens to be my favorite and probably the greatest gift to world given by arab cuisine - HUMMUS

The second dip is mix of thick yoghurt with cucumber and lemon juice.

Imagine a scrumptious bite of a sandwich with goodness of hummus, yoghurt and grill chicken, just irresistible and I'm sure it will be a big hit on your iftar table. It would ideal for breakfast or lunch box as well.

Hummus Recipe Below.

http://homemadebyfarheen.com/avacado-hummus/


Course Breakfast, Snack
Cuisine arabic
Prep Time 20 minutes
Cook Time 10 minutes
Total Time 30 minutes
Servings 4
Author Mehraj Farheen

Ingredients

  • 1 Boneless Chicken Breast
  • Spices for chicken marination Salt, black pepper, lemon juice,generous pinch of cinnamom powder
  • 2 tbsp Olive oil
  • Handful Fresh corainder and mint leaves
  • 1 Cup Thick Yoghurt
  • 2 Cucumber Finely chopped
  • 4 tbsp Hummus

Instructions

  1. Cut the pita breads into quater and set aside

  2. Cut the Chicken pieces in stripes and marinate with Salt, black pepper, lemon juice,generous pinch of cinnamom powder for ten minutes

  3. Add oil, Use a grill pan to saute the chicken pieces, you can also use any normal pan for cooking. The chicken filling is ready!

  4. Take one cup one yoghurt, add finely chooped cucumber, lemon juice, salt and fresh herbs. The yoghurt dip is ready!

  5. Now, the final assembly,  take pita bread and spread 1 teaspoon hummus as first layer, followed by chicken filing and last  fill bread with yoghurt dip.

  6. Sprinkle some olive oil on the top before service.

  7. Make sure your preparing this sandwich just before service.

  8. In case,  you want to avoid the yoghurt dip, you can then grill the pita bread for 1 minute on each side with little olive oil.

Please follow and like us:
0
Print Recipe
Pita bread sandwich
Servings
Servings
13May/19

Rice & moong dal Chicken soup

 Ramadan Kareem.

Every year, with start of this pious month, I try my best to reduce guilty indulgences, but for some reason, I can not completely avoid the fried or unhealthy food for the futoor time.

However I always make sure there is at least one healthy soup on my iftar table, the soup recipe I'm sharing with this post is very nostalgic for both me and my husband. After our wedding we stayed in Chennai for almost 8 months. During the month of Ramadan, in every mosque a very fulfilling Aash/ganji/kanji is served  for iftar, its a very mildly spiced rice and lentils soup with vegetables, sometimes with chicken. 

The recipe i'm sharing is primarily an adaptation of same ganji but with slight difference in texture and spice level.

Course Appetizer, Soup
Cuisine Indian
Prep Time 15 minutes
Cook Time 15 minutes
Total Time 30 minutes

Ingredients

  • 2 tbsp Yellow moong dal
  • 4 tbsp Rice
  • 250 grams Chicken with bones cut into small pieces
  • 3 Green Chillies
  • 1 Medium finely chopped onion
  • Masala powders - 1/4 tsp turmeric, 1/2 tsp zeera powder, 1/2 tsp coriander powder, 2 generous pinch of garam masala powder
  • whole spices 1/2 inch cinnamon, 4 cloves, 3 cardamoms, 5-6 kebab cheeni, 2 bay leaves
  • 3 Tbsp Olive oil or any oil
  • 1/2 Tsp Ginger garlic paste
  • Fresh coriander and mint leaves

Instructions

  1. Grind rice and moong dal coarsely, wash and set aside
  2. In pressure cooker add 3 tbsp oil, crackle the whole spices

  3. Add thincly sliced onion and sauté until Golden Brown

  4. Add ginger garlic paste and cook until raw smell is released out, then add the spices and cook for 3 -4 minutes.

  5. Once the spices are cooked, add chicken and saute 2 minutes, followed by the rice and moong dal powder

  6. Saute for 2-3 minutes, add half of fresh coriander and mint leaves at this point

  7. Add around 1 and 1/2 glass of boiling water and pressure cook for two whistles

  8. Release pressure, adjust salt, add fresh mint and coriander leaves, generous pinch of garam masala and black pepper and cook on low flame for 2 minutes

  9. Serve with lemon wedges and fried onion

Recipe Notes

You can also add vegetables like carrot/beans/broccoli.

Please follow and like us:
0
Print Recipe
Rice & moong dal Chicken soup
Cuisine Indian
Servings
Cuisine Indian
Servings
06Mar/19

Kheema Pasta / Minced Meat Pasta

Kheema Pasta / Minced Meat Pasta

A super simple and delicious option for dinner time which is definitely kids-approved. This also makes a perfect recipe for times when your completely drained and short on time.

Course Main Course
Cuisine Indian, international
Prep Time 15 minutes
Cook Time 20 minutes
Total Time 35 minutes
Servings 4
Author Mehraj Farheen

Ingredients

  • 1 packet whole wheat drum pasta 500 gms
  • 250 grams Minced Meat Beef/Lamb
  • 2 Large Onions Finely Chopped
  • 1 Large Tomato Finely Chopped
  • 1 tbsp Garlic
  • 1 tbsp Ginger Finely Chopped
  • 1 tbsp Tomato paste
  • 3-4 Green Chillies
  • 1/2 Cup Corainder laves
  • 1 Piece Maggi cube
  • 4 tspn Oil
  • Salt as per taste
  • Black pepper 1/4 spoon
  • 1/2 Lemon Juice

Instructions

  1. Boil the pasta/Macroni with 1 tspn olive oil, salt and set aside

  2. In large pot, saute chopped ginger, garlic in oil until light brown

  3. Then add green chilly, onions saute for 4-5 minutes until the onion turns lightly brown

  4. Now the important step, add minced meat and fry nicely for 7-8 minutes, make sure your frying the minced meat nicely until the oil separates.
  5. Now add capsicum, tomato pieces and cook for 5 minutes until soft. You can also use other vegetable like beans and carrot.

  6. Lastly add the bolied pasta, salt, black pepper, give a nice mix and end it of ny adding the fresh coriander leaves and add half lemon Juice

Recipe Notes

If you don't want to use the Maggie stock cube, you can use add 1/4 tsp coriander spoon and 1/4 roasted cumin powder, but make sure your cooking these two masalas properly before adding the vegetables.

Another note, just before turning off the flame, add2-3 tablespoon of water. This way the pasta doesn't dry out.

Please follow and like us:
0
Print Recipe
Kheema Pasta / Minced Meat Pasta
Course Main Dish
Cuisine Italian
Servings
Course Main Dish
Cuisine Italian
Servings
Instructions
05Mar/19

Kheema Pasta / Minced Meat Pasta

Kheema Pasta / Minced Meat Pasta

A super simple and delicious option for dinner time which is definitely kids-approved. This also makes a perfect recipe for times when your completely drained and short on time.

Course Main Course
Cuisine Indian, international
Prep Time 15 minutes
Cook Time 20 minutes
Total Time 35 minutes
Servings 4
Author Mehraj Farheen

Ingredients

  • 1 packet whole wheat drum pasta 500 gms
  • 250 grams Minced Meat Beef/Lamb
  • 2 Large Onions Finely Chopped
  • 1 Large Tomato Finely Chopped
  • 1 tbsp Garlic
  • 1 tbsp Ginger Finely Chopped
  • 1 tbsp Tomato paste
  • 3-4 Green Chillies
  • 1/2 Cup Corainder laves
  • 1 Piece Maggi cube
  • 4 tspn Oil
  • Salt as per taste
  • Black pepper 1/4 spoon
  • 1/2 Lemon Juice

Instructions

  1. Boil the pasta/Macroni with 1 tspn olive oil, salt and set aside

  2. In large pot, saute chopped ginger, garlic in oil until light brown

  3. Then add green chilly, onions saute for 4-5 minutes until the onion turns lightly brown

  4. Now the important step, add minced meat and fry nicely for 7-8 minutes, make sure your frying the minced meat nicely until the oil separates.
  5. Now add capsicum, tomato pieces and cook for 5 minutes until soft. You can also use other vegetable like beans and carrot.

  6. Lastly add the bolied pasta, salt, black pepper, give a nice mix and end it of ny adding the fresh coriander leaves and add half lemon Juice

Recipe Notes

If you don't want to use the Maggie stock cube, you can use add 1/4 tsp coriander spoon and 1/4 roasted cumin powder, but make sure your cooking these two masalas properly before adding the vegetables.

Another note, just before turning off the flame, add2-3 tablespoon of water. This way the pasta doesn't dry out.

Please follow and like us:
0
Print Recipe
Kheema Pasta / Minced Meat Pasta
Servings
Servings